Bird’s-Eye-View (BEV) Detection Tutorial
This tutorial covers Bird’s-Eye-View (BEV) detection methods, including LSS (Lift-Splat-Shoot) and BEVFusion architectures for 3D object detection.
LSS (Lift-Splat-Shoot)
LSS Bird’s-Eye-View Conversion
We have added a new folder (mydetector3d/datasets/nuscenes/lss) to test Bird’s-Eye-View conversion based on the LSS model from lift-splat-shoot.
Installation Requirements
Install the required dependencies:
pip install nuscenes-devkit tensorboardX efficientnet_pytorch==0.7.0
Training LSS Model
Perform LSS training on the nuScenes v1.0-mini dataset:
# File: mydetector3d/datasets/nuscenes/lss/lssmain.py
train('mini', dataroot='/data/cmpe249-fa22/nuScenes/nuScenesv1.0-mini/', nepochs=100, gpuid=0, logdir='./output/lss')
Model Evaluation
The pretrained model is saved at /data/cmpe249-fa22/Mymodels/lss_model525000.pt. Use the eval_model_iou function in mydetector3d/datasets/nuscenes/lss/lssexplore.py for inference:
{'loss': 0.09620507466204373, 'iou': 0.35671476137624863}
Map Configuration Issue
When running viz_model_preds, you may encounter a missing map file error:
No such file or directory: '/data/cmpe249-fa22/nuScenes/nuScenesv1.0-mini/maps/maps/expansion/singapore-hollandvillage.json'
To fix this issue, extract and copy the map expansion files:
(mycondapy39) [010796032@cs001 nuScenes]$ unzip nuScenes-map-expansion-v1.3.zip
Archive:  nuScenes-map-expansion-v1.3.zip
creating: basemap/
inflating: basemap/boston-seaport.png
inflating: basemap/singapore-hollandvillage.png
inflating: basemap/singapore-queenstown.png
inflating: basemap/singapore-onenorth.png
creating: expansion/
inflating: expansion/boston-seaport.json
inflating: expansion/singapore-onenorth.json
inflating: expansion/singapore-queenstown.json
inflating: expansion/singapore-hollandvillage.json
creating: prediction/
inflating: prediction/prediction_scenes.json
(mycondapy39) [010796032@cs001 nuScenes]$ cp -r expansion/ nuScenesv1.0-mini/maps/
Visualization Results
After fixing the map issue, the evaluation figures from viz_model_preds are saved as eval000000_000.jpg (format: f'eval{batchi:06}_{si:03}.jpg') in the root folder.
Image dimensions: [4, 6, 3, 128, 352]
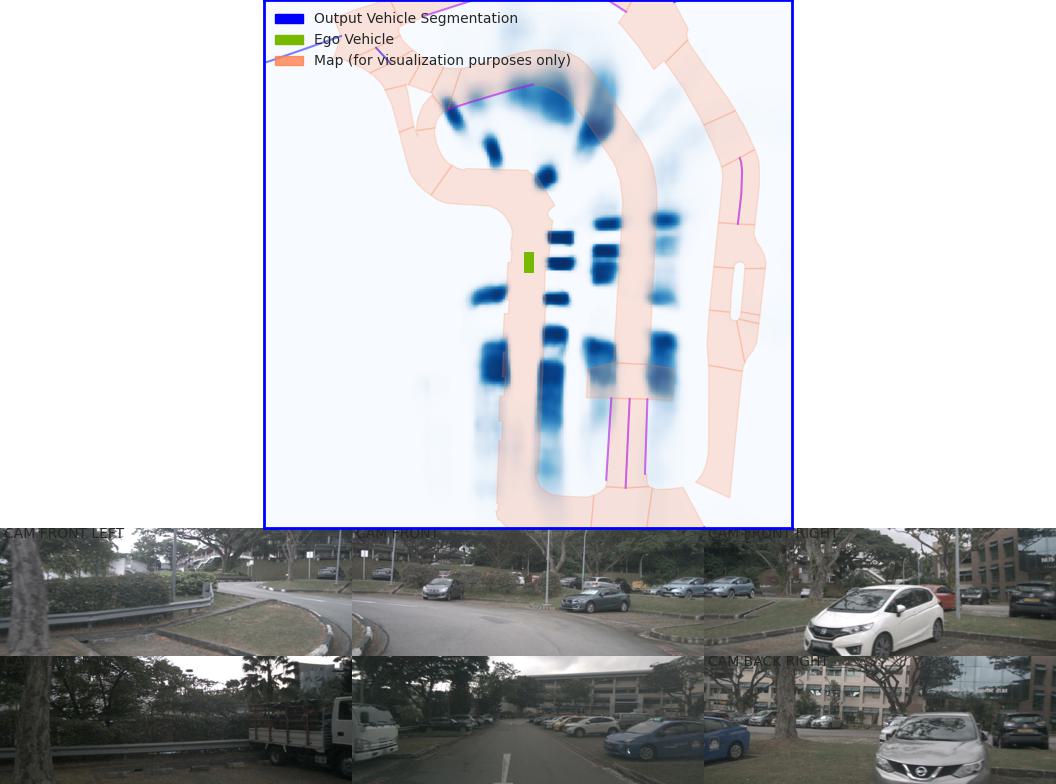 LSS model prediction visualization - Sample 1
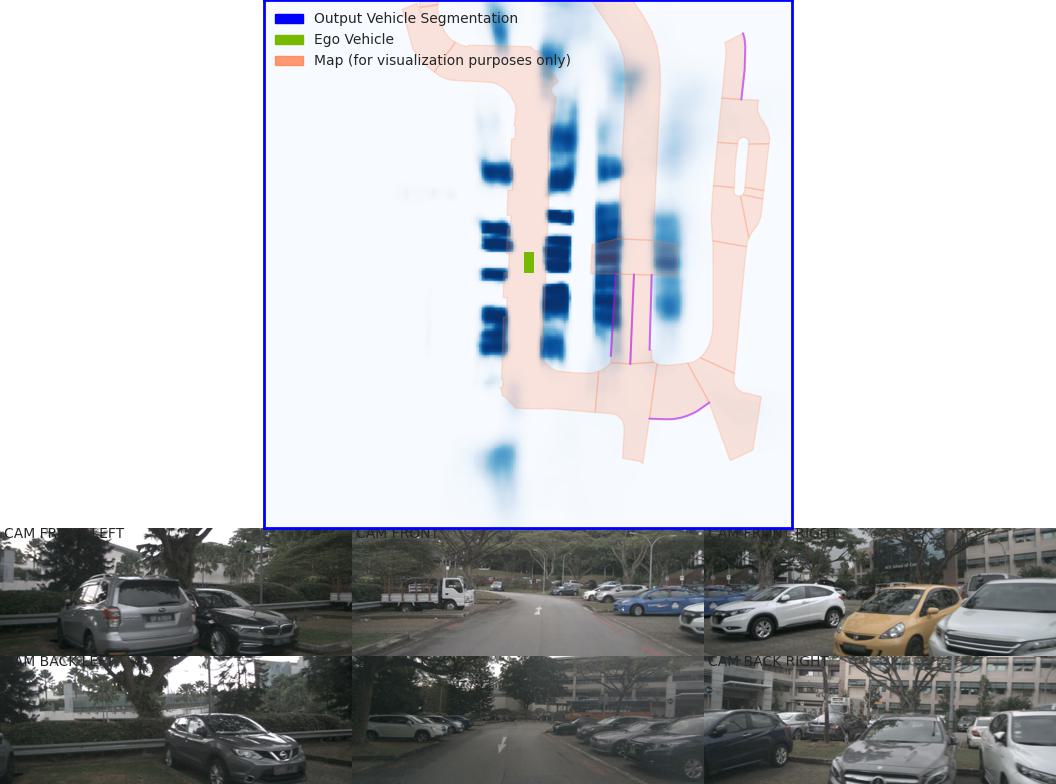 LSS model prediction visualization - Sample 2
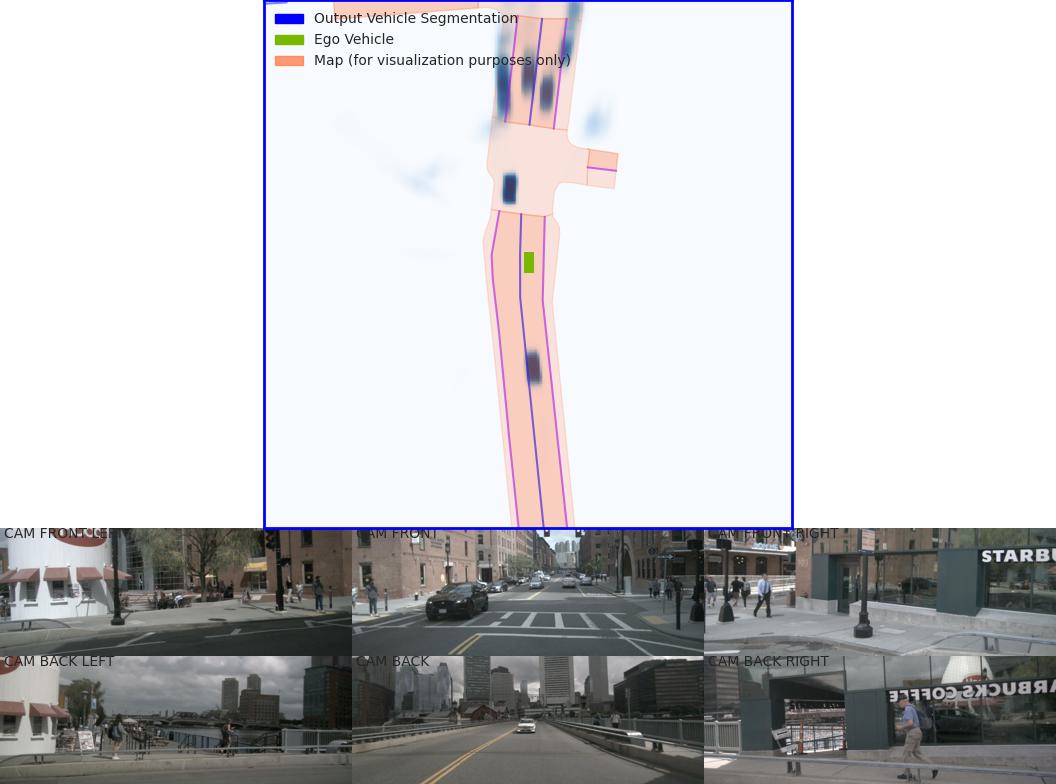 LSS model prediction visualization - Sample 3
LiDAR Calibration Check
The lidar_check function performs a visual verification to ensure extrinsics and intrinsics are parsed correctly:
Left: Input images with LiDAR scans projected using extrinsics and intrinsics
Middle: The projected LiDAR scan
Right: X-Y projection of the point cloud generated by the lift-splat model
 LiDAR calibration verification - Sample 1
 LiDAR calibration verification - Sample 2
Training Results
After completing training on the nuScenes v1.0-mini dataset using mydetector3d/datasets/nuscenes/lss/lssmain.py, the models are saved in the output folder as model1000.pt and model8000.pt. Using model8000.pt for inference yields:
{'loss': 0.23870943376311549, 'iou': 0.11804760577248166}
BEVFusion
BEVFusion code has been integrated into the mydetector3d framework for multi-modal 3D object detection.
BEVFusion Training
Training Configuration
Training Parameters (Updated: 10/21):
Config file:
mydetector3d/tools/cfgs/nuscenes_models/bevfusion.yamlBatch size: 4
Epochs: 128
Extra tag: 0522
Checkpoint:
/data/cmpe249-fa22/Mymodels/nuscenes_models/bevfusion/0522/ckpt/latest_model.pthOutput folder:
/data/cmpe249-fa22/Mymodels/
Available Models
(mycondapy310) [010796032@cs001 3DDepth]$ ls /data/cmpe249-fa22/Mymodels/nuscenes_models/
bevfusion  cbgs_pp_multihead
/data/cmpe249-fa22/Mymodels/nuscenes_models/cbgs_pp_multihead/0522/ckpt/checkpoint_epoch_128.pth
/data/cmpe249-fa22/Mymodels/nuscenes_models/bevfusion/0522/ckpt/checkpoint_epoch_56.pth  latest_model.pth
Training Command
(mycondapy310) [010796032@cs001 3DDepth]$ python ./mydetector3d/tools/mytrain.py --cfg_file='mydetector3d/tools/cfgs/nuscenes_models/bevfusion.yaml' --batch_size=4 --epochs=128 --extra_tag='0522' --ckpt='/data/cmpe249-fa22/Mymodels/nuscenes_models/bevfusion/0522/ckpt/latest_model.pth' --outputfolder='/data/cmpe249-fa22/Mymodels/'
023-10-21 17:09:07,965   INFO  Train:   59/128 ( 46%) [4534/30895 ( 15%)]  Loss: 0.4369 (0.437)  LR: 5.738e-05  Time cost: 00:47/346:12:13 [00:47/28342:55:05]  Acc_iter 1796445     Data time: 10.99(10.99)  Forward time: 36.29(36.29)  Batch time: 47.28(47.28)
BEVFusion Evaluation
Evaluation Results - Custom Trained Model
(mycondapy310) [010796032@cs002 3DDepth]$ python mydetector3d/tools/myevaluatev2_nuscenes.py --cfg_file='mydetector3d/tools/cfgs/nuscenes_models/bevfusion.yaml' --ckpt='/data/cmpe249-fa22/Mymodels/nuscenes_models/bevfusion/0522/ckpt/checkpoint_epoch_56.pth' --tag='1021' --outputpath='/data/cmpe249-fa22/Mymodels/'
Dataset Statistics:
Ground truth annotations: 6,019 samples
Original predictions: 1,203,800 boxes
After distance filtering: 807,685 boxes
After LiDAR/RADAR filtering: 807,685 boxes
After bike rack filtering: 807,498 boxes
Overall Performance Metrics:
mAP: 0.6215
mATE: 0.2811 (Average Translation Error)
mASE: 0.2565 (Average Scale Error)
mAOE: 0.3630 (Average Orientation Error)
mAVE: 0.2630 (Average Velocity Error)
mAAE: 0.1964 (Average Attribute Error)
NDS: 0.6747 (nuScenes Detection Score)
Evaluation time: 123.9s
Per-Class Performance:
Object Class |
AP |
ATE |
ASE |
AOE |
AVE |
AAE |
|---|---|---|---|---|---|---|
car |
0.867 |
0.182 |
0.155 |
0.064 |
0.242 |
0.187 |
truck |
0.517 |
0.356 |
0.210 |
0.077 |
0.273 |
0.215 |
bus |
0.704 |
0.339 |
0.185 |
0.076 |
0.505 |
0.267 |
trailer |
0.427 |
0.482 |
0.213 |
0.775 |
0.208 |
0.181 |
construction_vehicle |
0.257 |
0.630 |
0.439 |
0.877 |
0.146 |
0.350 |
pedestrian |
0.856 |
0.128 |
0.286 |
0.351 |
0.209 |
0.089 |
motorcycle |
0.678 |
0.206 |
0.235 |
0.382 |
0.333 |
0.268 |
bicycle |
0.493 |
0.172 |
0.261 |
0.613 |
0.187 |
0.013 |
traffic_cone |
0.755 |
0.122 |
0.316 |
nan |
nan |
nan |
barrier |
0.660 |
0.195 |
0.265 |
0.051 |
nan |
nan |
Evaluation Results - Pretrained Model
(mycondapy310) [010796032@cs002 3DDepth]$ python mydetector3d/tools/myevaluatev2_nuscenes.py --cfg_file='mydetector3d/tools/cfgs/nuscenes_models/bevfusion.yaml' --ckpt='/data/cmpe249-fa23/modelzoo/cbgs_bevfusion.pth' --tag='1022' --outputpath='/data/cmpe249-fa22/Mymodels/'
Model Loading Issues:
==> Loading parameters from checkpoint /data/cmpe249-fa23/modelzoo/cbgs_bevfusion.pth to cuda:0
Not updated weight backbone_3d.conv1.0.conv1.bias: torch.Size([16])
[... additional weight loading warnings ...]
==> Done (loaded 582/599)
Performance Metrics (Pretrained Model):
mAP: 0.2364
mATE: 0.7516
mASE: 0.6989
mAOE: 0.6777
mAVE: 0.6240
mAAE: 0.4523
NDS: 0.2977
Evaluation time: 100.4s
BEVFusion Architecture Overview
The BEVFusion model forward process consists of the following major components:
1. MeanVFE (Voxel Feature Encoder)
Input:
voxel_features([600911, 10, 5]),voxel_num_points([600911])Output:
batch_dict['voxel_features'] = points_mean.contiguous()#[600911, 5]
2. VoxelResBackBone8x (3D Backbone)
Input:
voxel_features([600911, 5]),voxel_coords([600911, 4])Output:
batch_dict['encoded_spconv_tensor']:out([2, 180, 180])batch_dict['encoded_spconv_tensor_stride']: 8batch_dict['multi_scale_3d_features']
3. HeightCompression (BEV Mapping Module)
Input:
encoded_spconv_tensor(Sparse[2, 180, 180])Output:
batch_dict['spatial_features']:[6, 256, 180, 180]batch_dict['spatial_features_stride']: 8
4. SwinTransformer (Image Backbone)
Input:
batch_dict['camera_imgs']#[6, 6, 3, 256, 704]Output:
batch_dict['image_features'](3 items):[36, 192, 32, 88][36, 384, 16, 44][36, 768, 8, 22]
5. GeneralizedLSSFPN (Feature Pyramid Network)
Input:
batch_dict['image_features']Output:
batch_dict['image_fpn'](2 items):[36, 256, 32, 88][36, 256, 16, 44]
6. DepthLSSTransform (View Transformation)
Lifts images into 3D and splats onto BEV features (from BEVFusion)
Input:
batch_dict['image_fpn']:[6, 6, 256, 32, 88]batch_dict['points']:[1456967, 6]
Output:
batch_dict['spatial_features_img']:[6, 80, 180, 180]Components: dtransform, depthnet, downsample
7. ConvFuser (Multi-Modal Fusion)
Input:
img_bev = batch_dict['spatial_features_img']:[6, 80, 180, 180]lidar_bev = batch_dict['spatial_features']:[6, 256, 180, 180]
Process:
cat_bev = torch.cat([img_bev, lidar_bev], dim=1)Output:
batch_dict['spatial_features'] = mm_bev:[6, 256, 180, 180]
8. BaseBEVBackbone (2D Backbone)
Input:
spatial_features = data_dict['spatial_features']:[6, 256, 180, 180]Output:
data_dict['spatial_features_2d']:[6, 512, 180, 180]
9. TransFusionHead (Detection Head)
Loss Functions:
loss_cls: SigmoidFocalClassificationLoss()loss_bbox: L1Loss()loss_heatmap: GaussianFocalLoss()
Input:
feats = batch_dict['spatial_features_2d']:[6, 512, 180, 180]Predictions:
'center':[6, 2, 200]'height':[6, 1, 200]'dim':[6, 3, 200]'rot':[6, 2, 200]'vel':[6, 2, 200]'heatmap':[6, 10, 200]'query_heatmap_score':[6, 10, 200]'dense_heatmap':[6, 10, 180, 180]
Loss Computation:
loss, tb_dict = self.loss(gt_bboxes_3d [6, 51, 9], gt_labels_3d [6, 51], res)
MMDetection3D Integration
Installation Guide
Reference: MMDetection3D Installation
Step-by-Step Installation
Install OpenMMLab Package Manager:
(mycondapy310) [010796032@coe-hpc2 3DDepth]$ pip install -U openmim
Install MMEngine:
(mycondapy310) [010796032@coe-hpc2 3DDepth]$ mim install mmengine
Looking in links: https://download.openmmlab.com/mmcv/dist/cu118/torch2.0.0/index.html
....
Successfully installed addict-2.4.0 mmengine-0.9.0 opencv-python-4.8.1.78 platformdirs-3.11.0 yapf-0.40.2
Install MMCV:
(mycondapy310) [010796032@coe-hpc2 3DDepth]$ mim install 'mmcv>=2.0.0rc4'
Looking in links: https://download.openmmlab.com/mmcv/dist/cu118/torch2.0.0/index.html
Collecting mmcv>=2.0.0rc4
  Downloading https://download.openmmlab.com/mmcv/dist/cu118/torch2.0.0/mmcv-2.1.0-cp310-cp310-manylinux1_x86_64.whl (98.6 MB)
Successfully installed mmcv-2.1.0
Install MMDetection:
(mycondapy310) [010796032@coe-hpc2 3DDepth]$ mim install 'mmdet>=3.0.0'
Looking in links: https://download.openmmlab.com/mmcv/dist/cu118/torch2.0.0/index.html
Collecting mmdet>=3.0.0
  Downloading mmdet-3.2.0-py3-none-any.whl (2.1 MB)
Successfully installed mmdet-3.2.0 terminaltables-3.1.10
Clone and Install MMDetection3D:
(mycondapy310) [010796032@coe-hpc2 3DObject]$ git clone https://github.com/open-mmlab/mmdetection3d.git -b dev-1.x
Handling Installation Issues
If you encounter Open3D installation issues:
ERROR: No matching distribution found for open3d
(mycondapy310) [010796032@coe-hpc2 mmdetection3d]$ nano requirements/runtime.txt #comment out open3d
(mycondapy310) [010796032@coe-hpc2 mmdetection3d]$ pip install -v -e .
Successfully installed black-23.10.0 flake8-6.1.0 iniconfig-2.0.0 lyft_dataset_sdk-0.0.8 matplotlib-3.5.3 mccabe-0.7.0 mmdet3d-1.2.0 mypy-extensions-1.0.0 pathspec-0.11.2 plotly-5.17.0 pluggy-1.3.0 plyfile-1.0.1 pycodestyle-2.11.1 pyflakes-3.1.0 pytest-7.4.2 tenacity-8.2.3 trimesh-4.0.0
Model Download and Testing
Download Pretrained Model
(mycondapy310) [010796032@coe-hpc2 mmdetection3d]$ mim download mmdet3d --config pointpillars_hv_secfpn_8xb6-160e_kitti-3d-car --dest .
processing pointpillars_hv_secfpn_8xb6-160e_kitti-3d-car...
downloading ━━━━━━━━━━━━━━━━━━━━━━━━━━━━━━━━━━━━━━━━ 18.4/18.4 MiB 117.4 MB/s eta 0:00:00
Successfully downloaded hv_pointpillars_secfpn_6x8_160e_kitti-3d-car_20220331_134606-d42d15ed.pth to /lts/home/010796032/3DObject/mmdetection3d
Successfully dumped pointpillars_hv_secfpn_8xb6-160e_kitti-3d-car.py to /lts/home/010796032/3DObject/mmdetection3d
Run Point Cloud Demo
(mycondapy310) [010796032@cs001 mmdetection3d]$ python demo/pcd_demo.py demo/data/kitti/000008.bin pointpillars_hv_secfpn_8xb6-160e_kitti-3d-car.py hv_pointpillars_secfpn_6x8_160e_kitti-3d-car_20220331_134606-d42d15ed.pth --no-save-vis
Sample Detection Results
(mycondapy310) [010796032@cs001 mmdetection3d]$ cat outputs/preds/000008.json
{
  "labels_3d": [0, 0, 0, 0, 0, 0, 0, 0, 0, 0],
  "scores_3d": [0.9750590920448303, 0.9682098627090454, 0.9457541108131409, 0.8904030919075012, 0.8890073299407959, 0.7703604698181152, 0.7550405859947205, 0.7058141827583313, 0.5811426639556885, 0.44102343916893005],
  "bboxes_3d": [
    [14.75867748260498, -1.0537946224212646, -1.5589320659637451, 3.7562406063079834, 1.6059986352920532, 1.558688998222351, -0.31321752071380615],
    [6.438138961791992, -3.8679745197296143, -1.7354645729064941, 3.147707223892212, 1.4599915742874146, 1.4284530878067017, -0.2998310327529907],
    [8.112329483032227, 1.216971516609192, -1.6341216564178467, 3.6662495136260986, 1.573140025138855, 1.5916767120361328, 2.8161733150482178],
    [20.169925689697266, -8.43094253540039, -1.6689856052398682, 2.381495237350464, 1.51751708984375, 1.5693042278289795, -0.3255223035812378],
    [33.455665588378906, -7.035743236541748, -1.3376567363739014, 4.213741302490234, 1.744563102722168, 1.6697136163711548, 2.828497886657715],
    [55.621891021728516, -20.328449249267578, -1.3771171569824219, 4.370689392089844, 1.7358696460723877, 1.7066415548324585, 2.8504137992858887],
    [3.637699842453003, 2.7381889820098877, -1.6892050504684448, 3.7212045192718506, 1.5820955038070679, 1.51765775680542, -0.2304447889328003],
    [25.04075050354004, -10.156379699707031, -1.6326467990875244, 3.739389181137085, 1.6084976196289062, 1.4840202331542969, -0.32967936992645264],
    [28.72532081604004, -1.552423357963562, -1.202379822731018, 3.69446063041687, 1.5429767370224, 1.5610381364822388, 1.2416549921035767],
    [40.87098693847656, -9.748966217041016, -1.3669469356536865, 3.8333828449249268, 1.6528679132461548, 1.5699278116226196, -0.28837358951568604]
  ],
  "box_type_3d": "LiDAR"
}
This tutorial provides a comprehensive overview of BEV detection methods, from basic LSS implementation to advanced BEVFusion architecture, along with practical MMDetection3D integration for production-ready 3D object detection systems.